In this tutorial, we will be building a winter scene using a javascript library called three.js.
Before we begin, you’ll need to download three.js here. After you unzip the file, open, the build folder, take the file three.min.js, and put it in a new project folder. You also need to navigate to the examples/js/controls folder and copy OrbitControls.js to your project folder.
For this project, we’ll only need to make two files:
In our html file, we just need to do two things. First, we’ll need to link our javascript files. Link the the three.js file, which contains the code for the library we’re using. Below that link three-orbit-controls.js, which contains the code that will allow us to rotate our view and zoom in and out in the animation, and finally your app.js which will contain all the code you write.
Second, we’ll add a style tag where we set the margin to 0, and width and height to 100%. This will ensure that the animation takes up the whole window.
<!DOCTYPE html>
<html>
  <head>
    <title>Winter Scene</title>
  </head>
  <body>

    <script src="js/three.js"></script>
    <script src="js/three-orbit-controls.js"></script>
    <script src="js/app.js"></script>

  </body>
</html>

<style>
  body { margin: 0; }
  canvas { width: 100%; height: 100% }
</style>
Now, let’s open our JavaScript file where we’ll be programming our animation. We’ll cover the setup very quickly here, but you can find a more detailed explanation in the Three.js documentation.
We need to do a few things to set up the scene. First, make a variable and set it to Three.Scene(). The scene is an object that will hold everything we create. Then, set the background color to 0xBAD4FF.
Next, create a camera variable that we set to THREE.PerspectiveCamera( 75, window.innerWidth / window.innerHeight, 1, 50 ). Here, in the PerspectiveCamera, specify our field of view, or how wide of an angle we see as the first attribute. The second attribute is the aspect ratio, and the third and fourth ones are the clipping planes, which determines how near or far the object must be before the camera stops rendering it.
Finally, we need to create the renderer, set it the width and height of the window, and append it to the document using document.body.appendChild().
Here’s what our code should look like:
var scene = new THREE.Scene();
scene.background = new THREE.Color(0xbad4ff);

var camera = new THREE.PerspectiveCamera( 75, window.innerWidth / window.innerHeight, 1, 50 );

var renderer = new THREE.WebGLRenderer();
renderer.setSize( window.innerWidth, window.innerHeight );
document.body.appendChild( renderer.domElement );
To create our snowflakes, we will first set a flakeCount to the desired amount of snowflakes. We’ll be using TetrahedronGeometry with a radius of .035 for our flake geometry and our snowflake material will be MeshPhongMaterial with a color of white.
To randomly generate these snowflakes onto the screen, we will use first define the varible snow as a Group and use a for loop to iterate through each snowflake and set a random position in terms of x, y, and z. Add the mesh to the group and add the group, snow, to the scene. Lastly, we should set the variable flakeArray to snow.children so we can animate each one of them after.
var flakeCount = 9000
var flakeGeometry = new THREE.TetrahedronGeometry(0.035) // radius
var flakeMaterial = new THREE.MeshPhongMaterial({ color: 0xffffff })
var snow = new THREE.Group()

for (let i = 0; i < flakeCount; i++) {
  var flakeMesh = new THREE.Mesh(flakeGeometry, flakeMaterial)
  flakeMesh.position.set(
    (Math.random() - 0.5) * 40,
    (Math.random() - 0.5) * 20,
    (Math.random() - 0.5) * 40
  )
  snow.add(flakeMesh)
}
scene.add(snow)

var flakeArray = snow.children
To build the surface of our scene, we will be using CircleGeometry with a radius of 10 and 50 segments (triangles). Our ground material is the same as before, MeshPhongMaterial. To give the ground the right orientation, we can rotate it 90 degrees on it’s x axis, or pi/2 radians. Then we set the ground’s y position to -1.8 to bring it slightly below the level of the camera.
var groundGeometry = new THREE.CircleGeometry(10, 50)
var groundMaterial = new THREE.MeshPhongMaterial({ color: 0xffffff })
var ground = new THREE.Mesh(groundGeometry, groundMaterial)
ground.position.y = -1.8
ground.rotation.x = -Math.PI / 2
scene.add(ground)
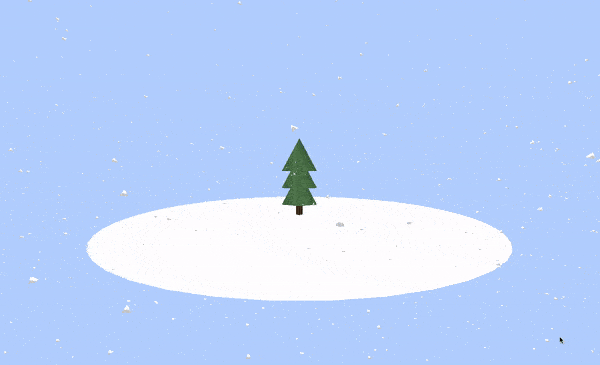
Finally, we can now build our tree. Our tree will consist of a trunk, and the three leaves in a cone shape. We set the tree variable to a Group and then define CylinderGeometry with a radius top and bottom of .2 and a height of 1. Again, we also use MeshPhongMaterial with a color of 0x49311c for the trunk material.
// tree
var tree = new THREE.Group()
var trunkGeometry = new THREE.CylinderGeometry(0.2, 0.2, 1)
var trunkMaterial = new THREE.MeshPhongMaterial({ color: 0x49311c })
var trunk = new THREE.Mesh(trunkGeometry, trunkMaterial)
tree.add(trunk)
Since this only defines the trunk, we also need to add the leaves which make the tree, well, look like a tree. We will use ConeGeometry with a radius of 1.2, height of 2, and 6 radial segments. Now once we add this to the tree group, we can define leaves for the middle and top, all by changing just the vertical position, y. If we set the y to a unit higher, then of course, the leaves element will rise one unit.
// leaves

var leavesGeometry = new THREE.ConeGeometry(1.2, 2, 6)
var leavesMaterial = new THREE.MeshPhongMaterial({ color: 0x3d5e3a })
var leavesBottom = new THREE.Mesh(leavesGeometry, leavesMaterial)
leavesBottom.position.y = 1.2
tree.add(leavesBottom)

var leavesMiddle = new THREE.Mesh(leavesGeometry, leavesMaterial)
leavesMiddle.position.y = 2.2
tree.add(leavesMiddle)

var leavesTop = new THREE.Mesh(leavesGeometry, leavesMaterial)
leavesTop.position.y = 3.2
tree.add(leavesTop)

tree.position.y = -1.3
scene.add(tree)
We’ve written everything to build our scene. All we have to do now is to render it!
Right now, the elements are all black, since there is no light shine onto them! Let’s fix that. We’ll set two PointLights where we will shine white light with an intensity of .3 on each side. We will also have an AmbientLight which illuminates the whole scene equally with an intensity of .8.
var rightLight = new THREE.PointLight(0xffffff, 0.3, 0)
rightLight.position.set(10, 20, 7)

var leftLight = new THREE.PointLight(0xffffff, 0.3, 0)
leftLight.position.set(-10, 20, 7)

var ambientLight = new THREE.AmbientLight(0xffffff, 0.8)
scene.add(rightLight)
scene.add(leftLight)
scene.add(ambientLight)
To be able to interact with the scene, we must define our scene’s OrbitControls so that one can drag their mouse to move the scene. It is also essential that we zoom out to be able to see the whole scene, so we must set the scene’s camera.position.z to 15 and camera.position.y to 1 to view the scene at a higher perspective.
var controls = new THREE.OrbitControls(camera, renderer.domElement)

camera.position.z = 15
camera.position.y = 1
controls.update()
Now, to animate the snowflakes, we write two for loops. FlakeArray is an array containing each individual snowflake as we had defined earlier. The first for loop takes all the flakes from FlakeArray[0] to flakeArray[flakeArray.length/2], and the second for loops takes all the flakes from flakeArray[flakeArray.length/2] to flakeArray[flakeArray.length].
We use flakeArray[i].rotation.y/x/z to make each flake spin on three axes, with all the flakes in our first loop spinning one direction and all the flakes in our second loop spinning the opposite direction.
In both for loops, we set the y position of each snowflake to decrease, making the snow fall. Finally, in each loop we add an if statement that says if a flake falls below a certain y position, we increase the y position to bring it back to the top of the scene, causing the snowfall to go on infinitely.
Lastly, we just update the controls and call our animate function to render the scene.
var animate = function() {
  requestAnimationFrame(animate)

  for (i = 0; i < flakeArray.length / 2; i++) {
    flakeArray[i].rotation.y += 0.01
    flakeArray[i].rotation.x += 0.02
    flakeArray[i].rotation.z += 0.03
    flakeArray[i].position.y -= 0.018
    if (flakeArray[i].position.y < -4) {
      flakeArray[i].position.y += 10
    }
  }
  for (i = flakeArray.length / 2; i < flakeArray.length; i++) {
    flakeArray[i].rotation.y -= 0.03
    flakeArray[i].rotation.x -= 0.03
    flakeArray[i].rotation.z -= 0.02
    flakeArray[i].position.y -= 0.016
    if (flakeArray[i].position.y < -4) {
      flakeArray[i].position.y += 9.5
    }

    snow.rotation.y -= 0.0000002
  }
  controls.update()

  renderer.render(scene, camera)
}

animate()
There you have it! Try editing the project to your personal taste and of course, sharing it on the community forum!