Building a chat app is pretty complex. However, with a framework like Node.js, and libraries like Socket.io and Express, a basic chat app is achievable with just a couple lines of code. Using Node.js, we can write JavaScript for the server, and with Socket.io and Express, we can make use of websockets to push messages to users from the server in real-time.
We’re going to be creating a Node.js app, so make sure you have it installed.
To start:
npm init . The will create a new package.json file. (it will ask you name/version, etc.)npm install --save express // a web framework for nodenpm install --save socket.io // real-time module for our appNow that our dependencies are installed, let’s create our file structure:
server.js filepublic with the following files:
index.htmlstyle.cssclient.jsOpen up the server.js file. Here’s where we need to require express and socket.io, and create a new server. We also need to use app.get to deliver an HTML file easily. In addition, we have to let express know that all our static (html,css,js) files are in the public folder. Lastly, we need to open up a port on our localhost hostname.
  var express = require('express');
  var app = express();
  var server = require('http').createServer(app);
  var io = require('socket.io')(server);

  app.get('/', function(req, res, next) {
  	res.sendFile(__dirname + '/public/index.html')
  });

  app.use(express.static('public'));

  server.listen(7777);
Now, open your index.html file in the public folder. In there, we will need to create a normal HTML document with the following:
form with two inputs
ul with an id for the messages to go in/socket.io/socket.io.jsclient.js <html>
<head>
<title> Real Time Chat </title>
<meta name="viewport" content="width=device-width, initial-scale=1" />
<link rel="stylesheet" href="style.css" />
</head>
<body>
<h1> Chat! </h1>
<form>
<input id="message" type="text" placeholder="message">
<input type="submit" value="Send">
</form>
<ul id="thread"></ul>
<script src="https://code.jquery.com/jquery-3.1.1.min.js"></script>
<script src="/socket.io/socket.io.js"></script>
<script src="client.js"></script>
</body>
</html>
Now, if you cd into the file on your terminal, run node server.js, and headover to localhost:7777 in your browser, you should see your HTML file being served.
Open up your client.js file. At this point, we need to connect to our server using io.connect.
On connect, let us emit a message to confirm our connection with an event of join.
  var socket = io.connect('http://localhost:7777');
  socket.on('connect', function(data) {
      socket.emit('join', 'Hello server from client');
  });
Then, we can open back up our server.js file and log a message that the client is connected. Also, we can listen for the join event we wrote earlier to log the data from the client. Here’s how it’ll work:
  var express = require('express');
  var app = express();
  var server = require('http').createServer(app);
  var io = require('socket.io')(server);

  app.get('/', function(req, res, next) {
  	res.sendFile(__dirname + '/public/index.html')
  });

  app.use(express.static('public'));


  io.on('connection', function(client) {
  	console.log('Client connected...');

  	client.on('join', function(data) {
  		console.log(data);
  	});
  });

  server.listen(7777);
Now, if you re-run the server.js file in your terminal (CTRL+C to exit) and refresh localhost:7777 in your browser, you should see the messages client connected... & Hello server from client in your terminal which confirms our connection!
Finally! Now that we have a connection, we can use it to emit and send messages. Here is what we need to do in our client.js file:
thread) that will recieve any messages emitted by ther servermessage id (in our input)return false; to prevent the from from it’s default action (refreshing page) // initializing socket, connection to server
var socket = io.connect('http://localhost:7777');
socket.on('connect', function(data) {
socket.emit('join', 'Hello server from client');
});
// listener for 'thread' event, which updates messages
socket.on('thread', function(data) {
$('#thread').append('<li>' + data + '</li>');
});
// sends message to server, resets & prevents default form action
$('form').submit(function() {
var message = $('#message').val();
socket.emit('messages', message);
this.reset();
return false;
});
However, before we have a functional application, we have to add our messages event to our server and emit it to our thread event!
  var express = require('express');
  var app = express();
  var server = require('http').createServer(app);
  var io = require('socket.io')(server);

  app.get('/', function(req, res, next) {
  	res.sendFile(__dirname + '/public/index.html')
  });

  app.use(express.static('public'));


  io.on('connection', function(client) {
  	console.log('Client connected...');

  	client.on('join', function(data) {
  		console.log(data);
  	});

  	client.on('messages', function(data){
  		client.emit('thread', data);
  		client.broadcast.emit('thread', data);
  	});
  });

  server.listen(7777);
There you go! Our messages event is listened for and once to server recieves it it is broadcasted to all the other clients using client.broadcast.emit.
Before we finish, let’s style the app a bit. Open up the style.css file and customize it to your liking!
  html, body {
    text-align: center;
    font-family: 'Avenir Next', 'Helvetica', 'Arial', sans-serif;
  }

  html,body,li,form,ul {
    padding: 0;
    margin: 0;
  }

  form {
    padding-bottom: 2%;
  }

  li {
    list-style: none;
    width: 100vw;
  }

  li:nth-child(odd) {
    background: #eee;
  }
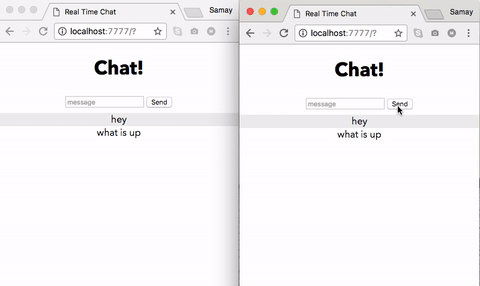
Well, now you have a basic form of communication! If you open up multiple tabs, you’ll see the messages are being sent in real-time!