
What is an Ethereum Token?
Ethereum is an open software platform based on blockchain technology that enables developers to build and deploy decentralized applications. Many dApps have their own token built on top of the Ethereum network to crowdfund or run the dApps.
In this tutorial, we’ll be building a ERC20 standard token that is capable of the following:
- checking balances
- transfer tokens
- transfer tokens from an address to another
- approve account(s) to withdraw tokens
- display amount approved for withdrawal between two accounts
Writing our Token Contract
We will be programming in Solidity, the language of the Ethereum network created for smart contracts. Open up a text editor and create a file with your token name and the .sol file extension at the end. Note that this token contract tutorial is based on the ERC20 implementation from Token Factory.
Let’s write a ERC20Token contract by declaring all our methods:
pragma solidity ^0.4.4;

contract ERC20Token {

    function totalSupply() constant returns (uint256 supply) {}

    function balanceOf(address _owner) constant returns (uint256 balance) {}

    function transfer(address _to, uint256 _value) returns (bool success) {}

    function transferFrom(address _from, address _to, uint256 _value) returns (bool success) {}

    function approve(address _spender, uint256 _value) returns (bool success) {}

    function allowance(address _owner, address _spender) constant returns (uint256 remaining) {}

    event Transfer(address indexed _from, address indexed _to, uint256 _value);
    event Approval(address indexed _owner, address indexed _spender, uint256 _value);
}
Here, we define the functions of the ERC20 Token standard as mentioned above. One can see that totalSupply() returns a uint, or value of tokens in circulation. balanceof() and allowance() also return integers, while transfer(), transferFrom(), and approve() return boolean (true/false) values. The parameters of these functions have an address field which is the ETH public key of a user. The two event methods emit details of transfers and approvals.
Solidity uses contract inheritance, so let’s create another contract to implement the methods we’ve defined. In this contract, we’ll need to start off by creating an array, or mapping addresses to balances. Along with our balances array, we also need an allowed array to indicate how much of our token an address can withdraw from another address. Lastly, let’s also define a public integer totalSupply which will hold the amount of tokens we will have in circulation.
contract Token is ERC20Token {

    mapping (address => uint256) balances;
    mapping (address => mapping (address => uint256)) allowed;
    uint256 public totalSupply;

}
Adding to this contract, we need to implement the rest of our methods. Our transfer() function takes two parameters: the address we are sending our token to (address _to), and the amount we are sending (uint256 _value). We will be returning a bool value (true/false) to indicate whether our tokens have been transferred successfully or not.
In our function, we have to deduct the amount of tokens spent by the sender and add the token value to the destination address. However, we will do this only when certain conditions are met. So, we’ll use a if statement that will transfer the tokens only if the sender’s balance is more than or equal to the value of tokens being sent and if that value if over 0. Otherwise, the function will return false. After we complete the transfer, we emit the details of the transaction with the Transfer event.
function transfer(address _to, uint256 _value) returns (bool success) {
        if (balances[msg.sender] >= _value && _value > 0) {
            balances[msg.sender] -= _value;
            balances[_to] += _value;
            Transfer(msg.sender, _to, _value);
            return true;
        } else { return false; }
    }
Our transferFrom method is almost identical from the one above, but since we are transferring tokens from one address to another, we need to add an address _from parameter. We also need to check if the number of tokens being transferred is approved.
function transferFrom(address _from, address _to, uint256 _value) returns (bool success) {
    if (balances[_from] >= _value && allowed[_from][msg.sender] >= _value && _value > 0) {
        balances[_to] += _value;
        balances[_from] -= _value;
        allowed[_from][msg.sender] -= _value;
        Transfer(_from, _to, _value);
        return true;
    } else { return false; }
}
To implement our balanceOf() method, we just need to return the value stored in the balances array for the address inputted.
function balanceOf(address _owner) constant returns (uint256 balance) {
      return balances[_owner];
  }
There are two remaining methods to develop a ERC20 standard token. The approve() method allows allowances to be added for the sender to withdraw tokens from a certain address. It will call the Approval() event to emit the details of the approval.
Lastly, we can return the allowance an address can withdraw of another address.
function approve(address _spender, uint256 _value) returns (bool success) {
        allowed[msg.sender][_spender] = _value;
        Approval(msg.sender, _spender, _value);
        return true;
    }

function allowance(address _owner, address _spender) constant returns (uint256 remaining) {
        return allowed[_owner][_spender];
    } // end of Token contract
To initialize our token, we can create another contract inherited from the Token contract with our token name. For this example, I’m going to be creating 1,000 Enlight, or ENLT tokens.
We want to make sure that, since this isn’t an ICO, if ether is sent to this address, we send it back. In this contract, we will also be defining our token name, number of decimals to show, and the token symbol.
contract ENLT is Token {

    function () {
        //if ether is sent to this address, send it back.
        throw;
    }

    string public name;
    uint8 public decimals;
    string public symbol;

    function ENLT( // should have the same name as the contract name
        ) {
        balances[msg.sender] = 1000;    // creator gets all initial tokens
        totalSupply = 1000;             // total supply of token
        name = "Enlight";               // name of token
        decimals = 0;                  // amount of decimals
        symbol = "ENLT";                // symbol of token
    }

    /* Approves and then calls the receiving contract */
    function approveAndCall(address _spender, uint256 _value, bytes _extraData) returns (bool success) {
        allowed[msg.sender][_spender] = _value;
        Approval(msg.sender, _spender, _value);

        if(!_spender.call(bytes4(bytes32(sha3("receiveApproval(address,uint256,address,bytes)"))), msg.sender, _value, this, _extraData)) { throw; }
        return true;
    }
}
The approveAndCall() method runs when the contact is authorized to transfer an amount of tokens from the sender account, and the function receiveApproval() is called in the receiving contract where the transfer can be done.
Publishing our contract to the Testnet
Now that we’ve written our token contract, we can deploy it to the Ethereum testnet.
Metamask
Download the Metamask extension. This extension will help us connect to the test blockchain easily.
Once it installs, create a password. On the top left of the extension, connect to the Ropsten Test Network. Since we are on the test network, we will need some test ether to deploy our contract. Go to this faucet to get 1 free test Ether.
Ethereum Remix
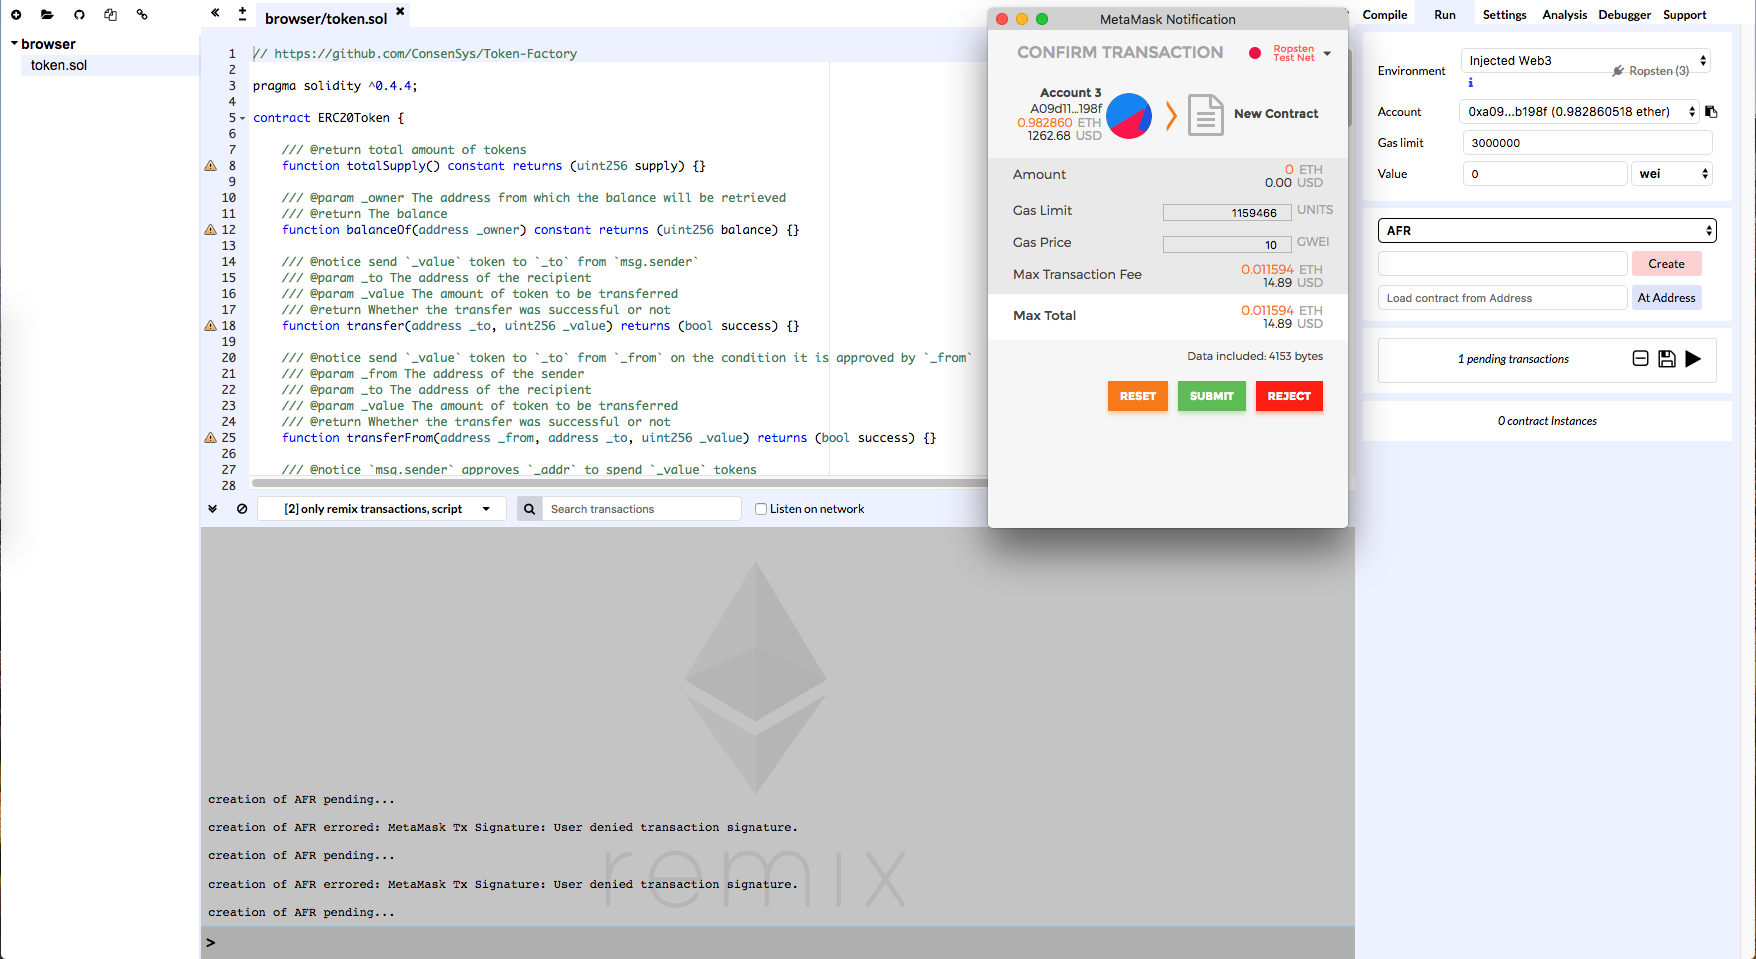
Now, go to Ethereum’s Solidity IDE so we can deploy the contract. Copy the contract code and click on the run tab up top. Make sure your environment is set to Injected Web3 and then select on your token contract and click create. Metamask will now pop up asking to complete the transaction of paying for fees. Once you click submit, your contract will be published.
If you go to the “sent” tab on Metamask, you will be able to see that our contract is published. Click on the contract image to pull up the testnet explorer.
Checking our balance in Metamask
On the explorer page, copy the contract address. To add the tokens to our wallet, go to Metamask, select the token tab, and then click on add tokens. Copy the Token contract address and click add. You’ll now be able to see that you own X amount of your token!

Sending and Receiving Tokens
To interact with your contract, you could build a dApp that would use the smart contract as an API, but the easiest way to send and receive tokens for now would be to use a dApp called Token Factory. Simply enter your contract address and you have access to all the methods we programmed on our contract. If you want to test transactions, try creating another account on Metamask (top right) and send some tokens to that address (you can copy the address by clicking on the three dots next to the account name).
If you want some ENLT, drop a reply here and I’ll send you some!
Looking at Etherscan
If we take a look at ENLT’s page on Etherscan, we can see the total supply as well as all the token transfers that have taken place and all the token holders!
Coming soon will be a full fledged dApp built on the Ethereum network that will utilize smart contracts. Feel free to discuss this project on the community forum below.